Saturday, May 21, 2016

Configure DHCP on a Cisco ASA 5505

Wikipedia.org defines Dynamic Host Configuration Protocol (DHCP) as a network application protocol used by devices (DHCP clients) to obtain configuration information for operation in an Internet Protocol network. This protocol reduces system administration workload, allowing devices to be added to the network with little or no manual intervention.


The diagram has the network topology. In this network the firewall is the gateway of the 10.16.74.0/24 network. Firewall and Servers will be excluded from the DHCP pool.

First step is to configure the inside (LAN) interface on the 10.16.74.0/24 network

FIREWALL(config)#interface Vlan1
FIREWALL(config-if)#nameif inside
FIREWALL(config-if)#security-level 100
FIREWALL(config-if)#ip address 10.16.74.1 255.255.255.0


Next assign the LAN ports for the correct VLAN in this case port 1 of firewall will be on VLAN 1

FIREWALL(config)#interface Ethernet0/1
FIREWALL(config-if)#switchport access vlan 1
FIREWALL(config-if)#no shut


Lastly, configure the dhcp range and assign it to an interface. Configure DNS servers, one internal and one external in case the internal fails. Enable DHCP on the inside interface

FIREWALL(config)#dhcpd address 10.16.74.15-10.16.74.35 inside
FIREWALL(config)#dhcpd dns 10.16.74.10 4.2.2.2
FIREWALL(config)#dhcpd enable inside


In order to see which devices are receiving DHCP from the firewall run the following command

FIREWALL(config)#sh dhcpd binding

IP address Hardware address Lease expiration Type


Cisco article on configuring dhcp

http://www.cisco.com/en/US/docs/security/asa/asa71/configuration/gu...

Apple Pulls I0n1c's Security and Jailbreak Detection App From the App Store

Apple has pulled an app by hacker Stefan Esser (I01nic) that detected if your device was hacked.

The app could detect security anomalies and whether or not your device was jailbroken.

Here is Apple reasoning for pulling the app...

2.19 - Apps that provide incorrect diagnostic or other inaccurate device data will be rejected
22.2 - Apps that contain false, fraudulent or misleading representations or use names or icons similar to other Apps will be rejected

"We noticed that your app provides potentially inaccurate and misleading diagnostic functionality for iOS devices to the user. Currently, there is no publicly available infrastructure to support iOS diagnostic analysis. Therefore your app may report inaccurate information which could mislead or confuse your users. We encourage you to review your app concept and incorporate different content and features that are in compliance with the App Store Review Guidelines."

Esser says, "they keep ignoring the big question: why kill us and not the other jailbreak detectors or system info tools or iokit using tools..."

Source :- iClarified

Apple in India (Hyderabad)!!!

Good news for indian Apple Developers!

Apple has announced the opening of a new office in Hyderabad that will focus on development of Maps for Apple products, including iPhone, iPad, Mac and Apple Watch. The investment is said to accelerate Maps development and create up to 4,000 jobs.

“Apple is focused on making the best products and services in the world and we are thrilled to open this new office in Hyderabad which will focus on Maps development,” said Tim Cook, Apple’s CEO. “The talent here in the local area is incredible and we are looking forward to expanding our relationships and introducing more universities and partners to our platforms as we scale our operations.”

The new facility, located on the Waverock campus, will provide a world-class, LEED-certified home for the expanding Maps team.

“We are honored Apple chose Hyderabad as a home for its Maps development office,” said Telangana Chief Minister Kalvakuntla Chandrashekar Rao. “This will create thousands of jobs here and is a testament to our proactive approach, quality infrastructure and the excellent talent base we have in the region.”

“Apple is one of the most innovative companies in the world and we are very proud they chose us to partner with for this important project,” said Anup Jindal, RMSI’s CEO. “We are experts in geospatial data and we will be hiring thousands of people from the local area to support this effort.”

Apple says it supports over 640,000 iOS app developer jobs and other positions related to the iOS ecosystem across India. Notably, the company just announced an iOS app design and development accelerator in Bengaluru as part of a new initiative to support developers creating apps in India.

OS X 10.12 May Let You Unlock Your Mac Using Touch ID on the iPhone

Apple is working on a feature for OS X 10.12 that would let you unlock your Mac using Touch ID on the iPhone, reports MacRumors.

Apple engineers are designing an auto unlock function that would allow an iPhone to unlock a Mac when in close proximity, alleviating the need to enter a password on a password-protected Mac. The feature, which uses Bluetooth LE frameworks, will presumably work similarly to the automatic unlocking function on the Apple Watch, which allows an unlocked iPhone to bypass the passcode restriction on a connected Apple Watch.

The iPhone's Touch ID would likely be used as the login verification method. It's also possible that the Apple Watch could be used to unlock your Mac even when your iPhone isn't present.

Additionally, the new unlocking feature could work alongside Apple Pay support for web browsers with Touch ID on the iPhone being used to verify web purchases made on your Mac.

Apple is expected to unveil OS X 10.12 at WWDC in June; however, not all features for the operating system are set in stone and there is a chance the feature could be held back for a later date. It's also widely rumored that Apple will bring Siri to the Mac with OS X 10.12.

Thursday, May 19, 2016

Enable Port Forwarding in Fortinet Firewall.

Port Forwarding in fortinet is very simple. Follow the below steps and you are good to go.

Step-1

Open your fortinet and go to Policies and objects -> Virtual IPs


Step-2

Configure as shown below, Keep external ip empty if you are using any DynDNS service.
If you have static ip then you can enter the ip in there.


Step-3

Create one Virtual IP group and add the newly created ports in that as shown below.


Step-4

Now go to Policies and create one policy for port forwarding as shown below. In the destination address add the "port forward"  group.


Port forwarding is configured now in the Fortinet. You can now connect from outside on the ports forwarded.


Enable Site-To- Site VPN between Cisco & Fortinet

Here we will see how to configure the site to site vpn between Cisco RV042 & Fortinet Firewall.

Firtst we will configure on cisco rv042

Step-1


Open your cisco router and go toVPN -> Gateway to Gateway


Step-2

Configure as shown as below


Step-3


Step-4

Now we will coonfiure on the fortinet side
Go to VPN and select the "Site to Site" Cisco as show below


Step-5
Configure the Phase-1, Phase-2 as shown below in the template.


 Step-6

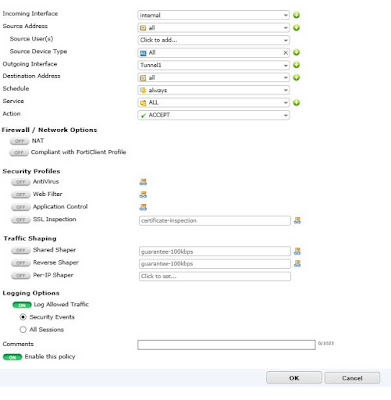
Now, go to the Policies and select "ipv4" create new policy as shown below.

 We have to create two policies 1. from internal(lan) netowrk to tunnel1(Vpn)
2. tunnel1(vpn) to internal(lan)


 Policy-2


Step-7

Now we will add the route in the system by adding the remote ip/range.


Now your VPN is up and running. you can go to the VPN and go to Monitor and select the Ipsec and you will see the VPN status as "UP".

Comment below if any queries.

Tuesday, May 17, 2016

Hyper-V Replication Between Two Workgroup Servers


Hyper-V replication is an essential ‘server availability’ tool for any organization. Whilst it is not a substitute for good backups; it will allow you to restore an up-to-date copy of your virtual servers very quickly, should your primary host hardware fail.
In this tutorial, i have built two Windows 2012 R2 servers using a pair of old Dell Optiplex 580’s (AMD Phenom CPU, upgraded to 8GB RAM each), and a single 8 port Netgear GB switch.

The Primary server name is: Truro
The Secondary server name is: Exeter
Lets get started…
Step 1: Build your host servers
  • Build two physical host servers – they need to be running 2012 R2 (or server 2012, which has less functionality)
  • Install the Hyper-V role.
  • Make sure both servers are fully patched though Windows update.
  • See if any of the Hyper-V hotfixes apply to your situation
Step 2: Download Makecert
Download makecert (extract from the full SDK), http://www.microsoft.com/en-us/download/details.aspx?id=8279
Step 3: Prepare the server directories
On both servers, make the following file structure:
C:\makecert
C:\makecert\copy
C:\makecert\import
Copy makecert.exe to c:\makecert on both servers

Step 4: Making the certificates
Using an admin command prompt
Run on the Primary Server:
c:\makecert\makecert -pe -n “CN=PrimaryTestRootCA” -ss root -sr LocalMachine -sky signature -r c:\makecert\PrimaryTestRootCA.cer

c:\makecert\makecert -pe -n “CN=TRURO” -ss my -sr LocalMachine -sky exchange -eku 1.3.6.1.5.5.7.3.1,1.3.6.1.5.5.7.3.2 -in “PrimaryTestRootCA” -is root -ir LocalMachine -sp “Microsoft RSA SChannel Cryptographic Provider” -sy 12 c:\makecert\PrimaryTestCert.cer

reg add “HKLM\SOFTWARE\Microsoft\Windows NT\CurrentVersion\Virtualization\Replication” /v DisableCertRevocationCheck /d 1 /t REG_DWORD /f

Run on the Replica Server:

c:\makecert\makecert -pe -n “CN=ReplicaTestRootCA” -ss root -sr LocalMachine -sky signature -r c:\makecert\ReplicaTestRootCA.cer”

c:\makecert\makecert -pe -n “CN=EXETER” -ss my -sr LocalMachine -sky exchange -eku 1.3.6.1.5.5.7.3.1,1.3.6.1.5.5.7.3.2 -in “ReplicaTestRootCA” -is root -ir LocalMachine -sp “Microsoft RSA SChannel Cryptographic Provider” -sy 12 C:\makecert\ReplicaTestCert.cer

reg add “HKLM\SOFTWARE\Microsoft\Windows NT\CurrentVersion\Virtualization\Replication” /v DisableCertRevocationCheck /d 1 /t REG_DWORD /f

Step 5: Export the certificates

On both the primary and replica servers
Launch an MMC
click File > Add/Remove Snap-in…

In the Add or Remove Snap-ins window, select Certificates from the Available Snap-ins list;

Click Add >; the Certificates snap-in window will appear;
In the Certificates snap-in window, click the Computer account radio button; click Next to continue;

In the Select Computer window, make sure the Local computer radio button is clicked; then click Finish;

In the Add or Remove Snap-ins window, click OK.

In the Microsoft Management Console on the primary server, expose the contents of Certificates (Local Computer), which can be found under the Console Root directory:
Expose the contents of the Personal directory; click the Certificates directory;

Right-click on the Truro certificate – PrimaryTestRootCA.cer; in the context menu that appears, mouse over All Tasks >; In the sub-menu that appears, click Export…

In the wizard, click next

In the Certificate Export Wizard that appears, click the Yes, Export the private key radio button and click Next;

Check and click next

Enter a password, click next

Export the key to to c:\makecert\copy\truroserver.pfx

Click finish

click ok

Repeat the above steps for the Replica server (Exeter).

Step 6: Import the certificates
On the primary server (Truro)
Copy the:
PrimaryTestCert
PrimaryTestRootCA.cer
TruroServer.pfx file you just created
To the replica servers (Exeter) c:\makecert\import directory
On the replica server (Exeter)
Copy the:
ReplicaTestCert
ReplicaTestRootCA.cer
ExeterServer.pfx file you just created
To the replica servers (Truro) c:\makecert\import directory
This is what you should now see on your Primary server (Truro):

run in admin cmd on Primary Server
certutil -addstore -f Root C:\makecert\import\ReplicaTestRootCA.cer

In the MMC on the primary server, make sure your still in Certificates (Local Computer)
Personal directory;

On the wizard that appears, click next.

Navigate and select the exeterserver.pfx file (you’ll need to select the dropdown menu to all items before it will appear).

Enter the password you set during the export

Click next

Click finish

Click ok.

Repeat for the Replica server (summary below):
run in admin cmd on Replica Server
certutil -addstore -f Root C:\makecert\import\PrimaryTestRootCA.cer
In the MMC on the replica server, make sure your still in Certificates (Local Computer)
Personal directory;
Right click on Personal directory, mouse over All Tasks >; in the submenu that appears, click Import…;
Locate the TruroServer.pfx file. enter the password (as per the export section)
Step 7: Configuring Hyper-V replication
On both primary and replica servers:
In Hyper-V manager, right click on the host server and select Hyper-V settings.

Select Replication Configuration Enabled as a Replica Server
Check the box – Enable this computer as a replica server
Select Use certificate-based Authentication (HTTPS)
Select the Allow replication from any authenticated server check box.

Then choose “Select Certificate…”
Make sure Truro is selected.

On the next screen, click ok.

Step 8: Check the firewall settings
Check the firewall rules are configured to allow hyperv replication. (Control Panel, Windows Firewall, Advanced). – both should have green ticks (if not, right click and enable).

Repeat on the replica server.
Step 9: Configuring the VM
Configure replication on the VM (right click, enable replication)

In the wizard, click next

Enter the name of the replica server (ie Exeter)

Select Certificate


Select the vhds you wish to replicate (you may wish to exclude swap partition drives if you have those configured)

Choose the replication frequency (30 seconds, 5 minutes or 15 minutes).

choose whether you need any recovery points (useful if you need to roll back the server to a previous state).

you may wish to seed the initial replica if your working on slow links.

Review and confirm

Step 10: Checking replication status and health
Primary server status: Normal

Right click on the VM – select view replication health
Replication should be normal

They’re you go…. Hyper-V replication configured between two workgroup computers.